A little while ago I embarked on the adventure of porting Yarn Spinner to Unreal Engine. While that task isn't finished, the first stage is and this is the opportune moment to write a blog post about the challenges thus far.
I didn't think porting Yarn Spinner would be easy, but I also didn't anticipate the hardest part (so far) would be reading the yarn files into Unreal.
This is a story of integrating protobuf into UE4.
Please note, this is a fairly dense blog post. This is because it is as much for me to process my thoughts and have a record of my thinking for later on when I forget it all, as it is for others to learn from. If that's not your style: sorry.
If you don't care about the story that led to this blog and are just after the example code please go to Github repo.
⚠️ This was written for Unreal Engine 4.24.3 using Visual Studio 15.9.21: It may not work for any other versions!
For Those That Came In Late
A little bit of backstory, Yarn Spinner uses Google's protocol buffers (also known as protobuf) as its internal storage format.
This might seem a little weird as Yarn is clearly a text format: you definitely write it as text.
While Yarn scripts are text you really don't want to be parsing through a giant blob of text every time you need the dialogue, we want something a bit more lightweight.
Additionally with the improvements to the localisation support in Yarn Spinner the core of the project no longer even cares about the dialogue itself, all it sees are line identifiers.
These line identifiers are then looked up in a strings table (a .csv file) to work out what to show to the user.
Under the hood then, Yarn dialogue is nothing but a big list of instructions that Yarn Spinner obeys, some of these instructions show lines to the user, others are responsible for features like reading variables or branching your story.
All of this means that keeping Yarn as text at runtime isn't the best move and we needed a binary format. We could have created our own format but that just invites problems, so we chose to move the internal format to protobuf because it matched our requirements:
- lightweight
- portable
- supports collection based data structures
and had a whole bunch of other benefits that are tricky to achieve already done for us:
- types and enums
- verification and error handling
- serialisation and deserialisation
- massive documentation and community
- many different programming environments supported
While I haven't tested this I would say something like FlatBuffers or Cap'n Proto might be an even better fit than protobuf, but they just don't have the supporting community, documentation, and environments that protobuf has. Docs and community trump features and performance every time. Maybe in the future we'll look again at changing the internal format but for now protobuf it is.
Portability
One of the main purposes of protobuf is its portability. Once you have your data serialised into protobuf you can then pass it around anywhere that supports protobuf. This means if we have a story in Yarn compiled down to protobuf we can just share around the protobuf files. In an ideal world this makes porting Yarn Spinner simpler as we don't need to reproduce the entire compiler toolchain, all you need is the ability to read in protobuf files and to port the runtime. Eventually you will probably also want to port the compiler over as well so that all platforms have an equivalent feature set, but for a "v1" of any Yarn Spinner port this approach reduces the workload massively.
What Unity Does
If you have used Yarn Spinner in Unity you don't ever have to worry about this, you just add your .yarn files to the project and that's it.
Behind the scenes we are actually running the Yarn Spinner compiler over them, extracting a strings table and spitting out a compiled protobuf yarn file .yarnc, but you never have to worry about this either.
At runtime when you ask for a particular piece of dialogue to be run, we load in the .yarnc file and use that to work out what to show.
The text form of your dialogue, the .yarn file itself, is never touched at runtime and won't even be baked into the final version of the game.
The Goal
For an initial version of Yarn Spinner in Unreal we decided we'd first take the compiled .yarnc protobuf files, and their string tables, and build a version of Yarn Spinner for Unreal that uses that.
It wouldn't be hugely user friendly but it would be enough to start working out kinks and figuring out the best flow to integrate Unreal and Yarn Spinner.
The path ahead was clear then:
- get protobuf working with UE4
- get it reading
.yarncfiles - build up the runtime around them
- add in blueprint support for all of this
The Plugin Pickle
Unreal has a system for extending Unreal called plugins, or maybe modules, or maybe they are the same thing? Who knows? From my current understanding, modules are standalone components that can be formed together into a plugin and this is my assumption for the rest of this blog, but I genuinely don't know.
This is the first issue I found when getting started: there isn't a lot of reliable and up to date information out there about plugins and modules in Unreal. What there is is often contradictory, and most of the example code for this on sites like Github are all on ancient versions of Unreal, and the UE4 wiki (before being taken down) while it did have some truly excellent info on it (luckly saved by the Internet Archive), was likewise filled with posts that were well out of date.
This the first time I can safely say Unreal is doing something worse than Unity. For the most part I have been super impressed with Unreal, and often have been favouring its approach to Unity's, but not for extensions. Some of this is just my inexperience with Unreal, but a lot of it isn't. There is so much knowledge in the Unreal community that you sadly only see glimpses of in the Unreal forums or occassionally popping up on twitter.
From this point onwards I'll be making a new project, integrating protobuf into it, creating some wrappers for a new protobuf message, and showing off using the protobuf message in a blueprint.
Tools
If you want to follow along with this you will need:
- git
- vcpkg
- Unreal Engine (I used v4.24.3)
- Visual Studio Community (I used v15.9.21)
- Windows Terminal/Command line (I will use the terms interchageably, sorry)
While this blog will be describing every step and code block in, I hope, sufficient detail that anyone can follow along I am assuming you are somewhat comfortable with writing code and using the terminal. I did all of this on Windows, in theory most of this is translatable to macOS but I have not tried to do so yet.
Creating the project
First things first, we need a project. While all our code will be going into our plugin we will still need a project so we can see if its working.
- Create a new project in Unreal
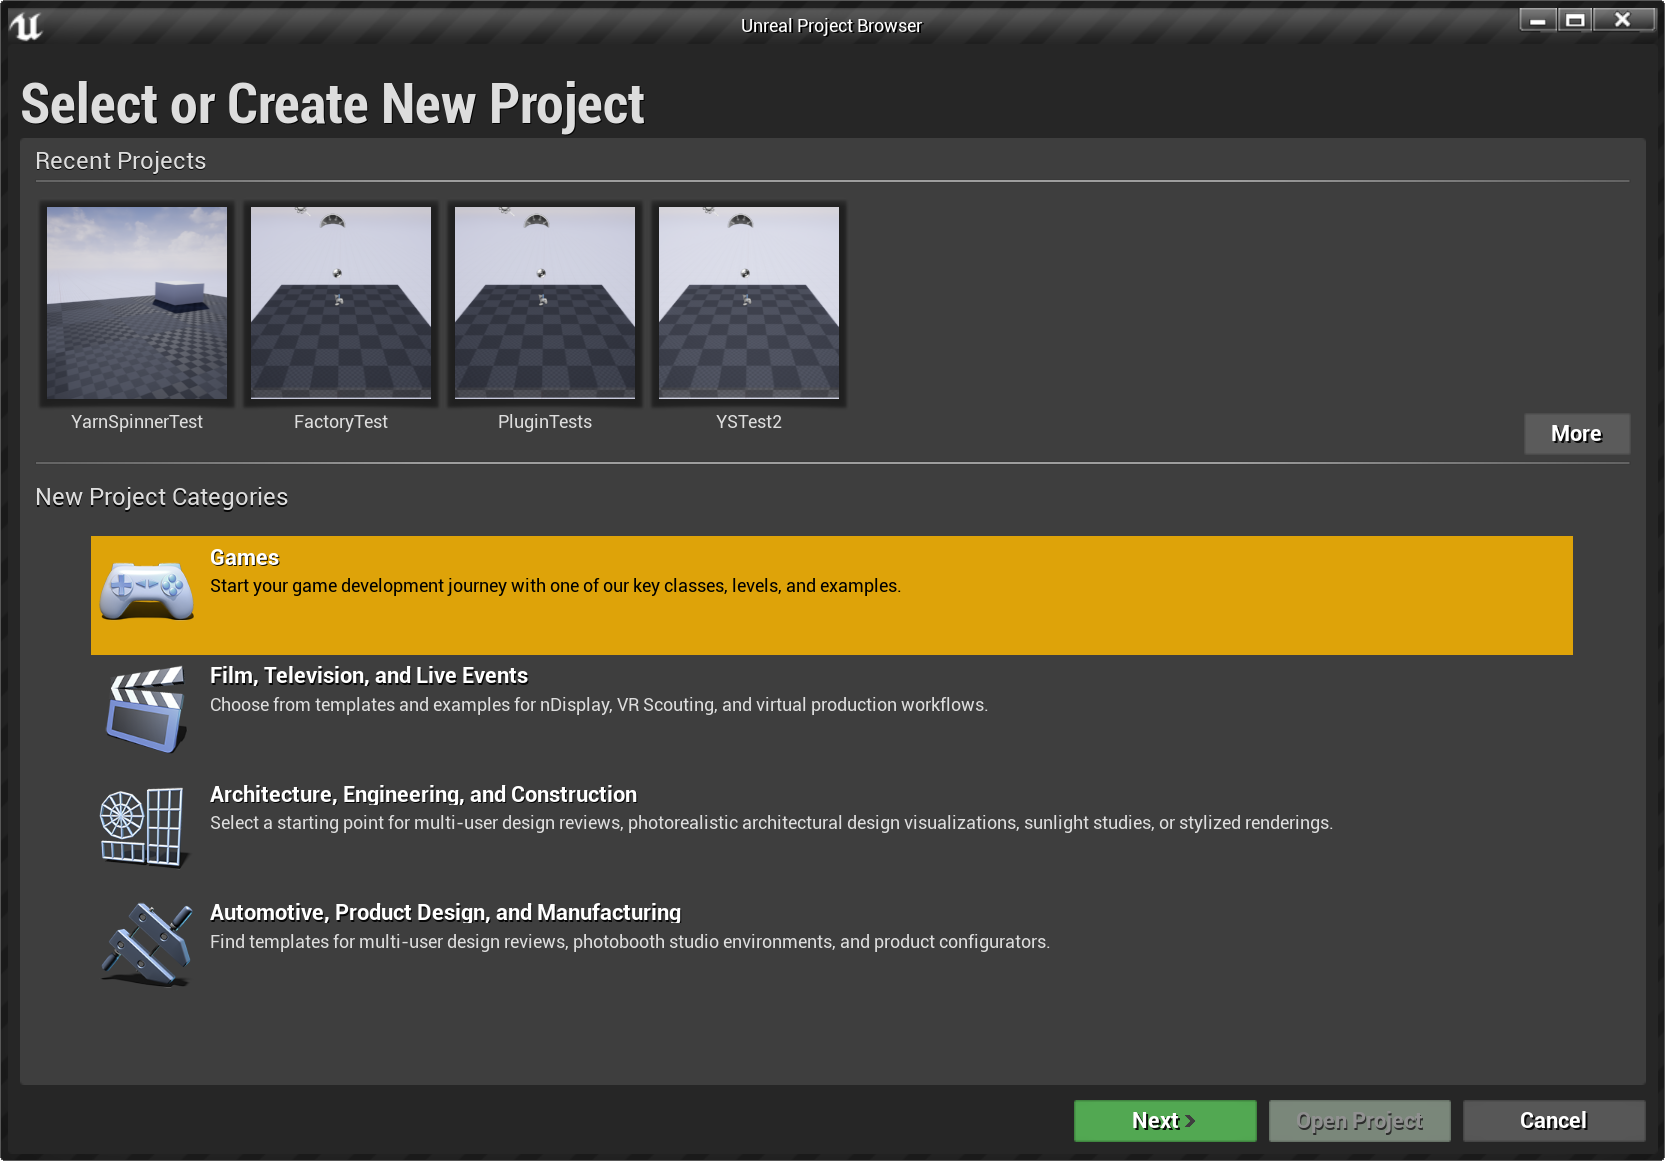
- Choose the blank template
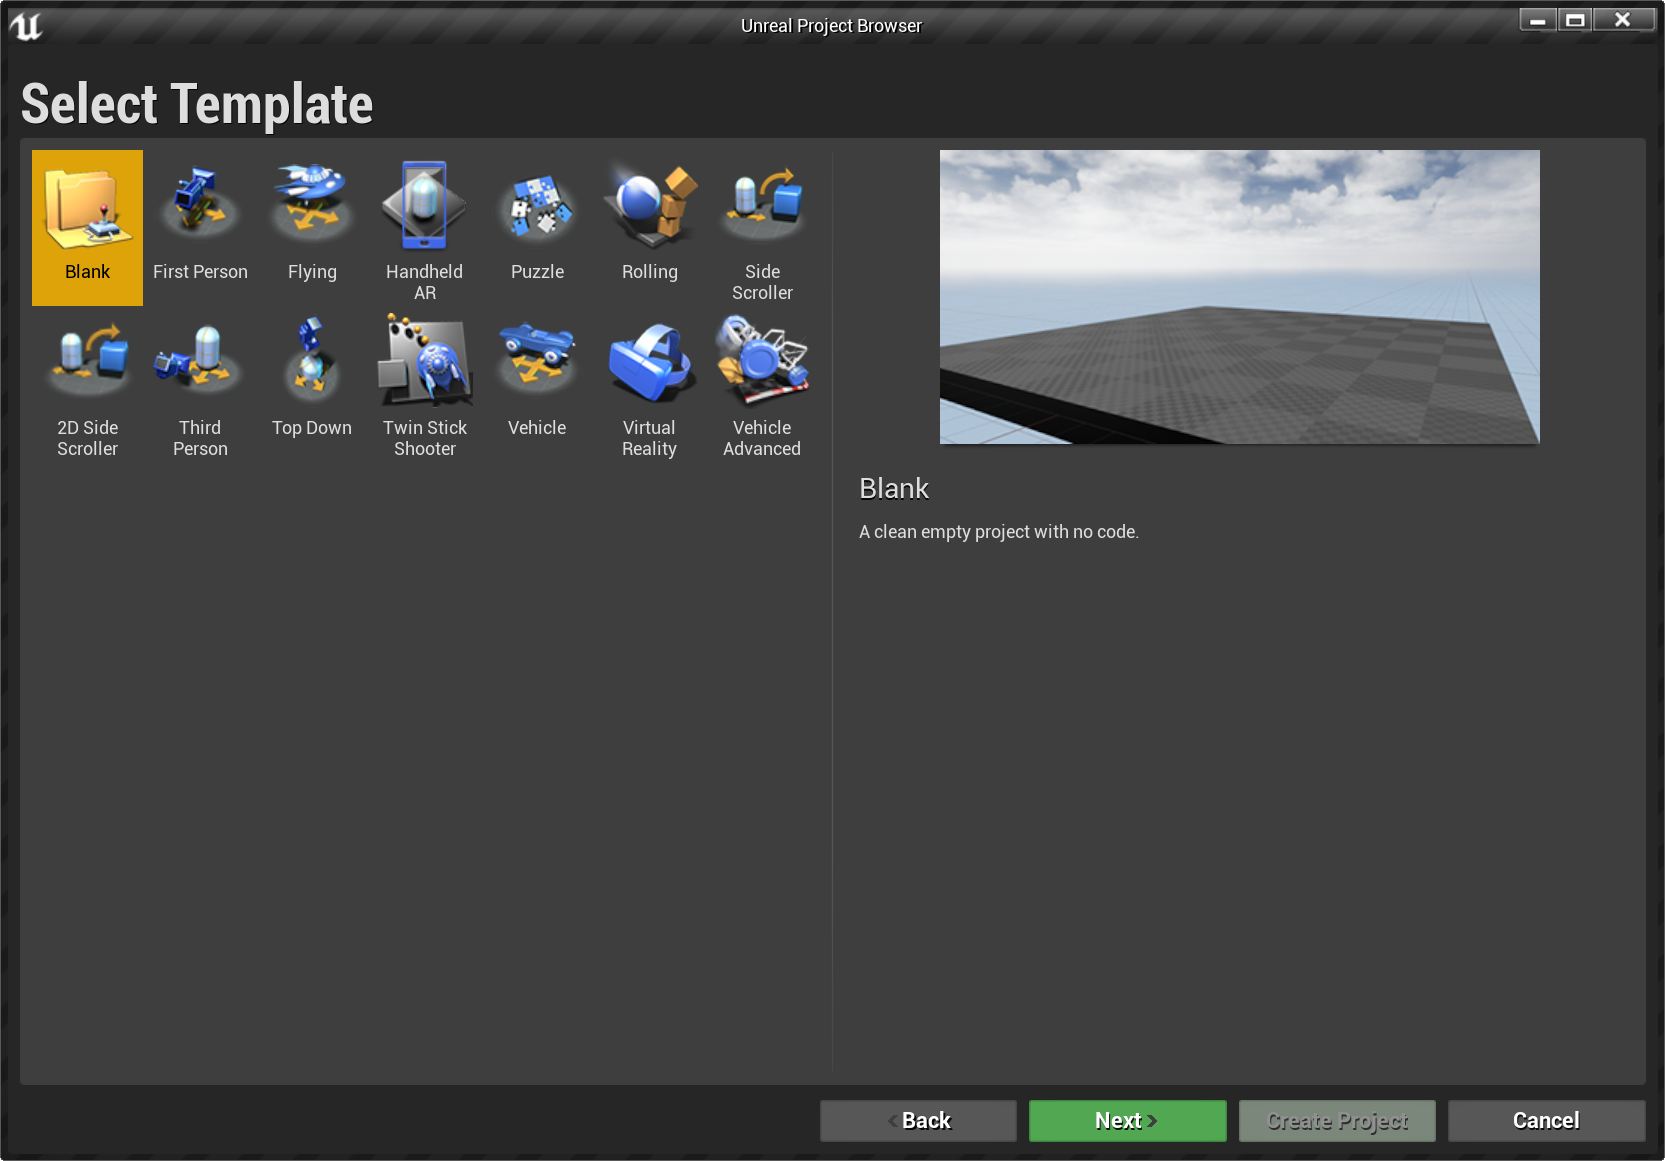
- Set the project to use C++ instead of Blueprints
- Select No Starter Content
- Call the project
ProtobufTestProject - Save the project in your preferred location (in my case
D:\Development\Unreal\)
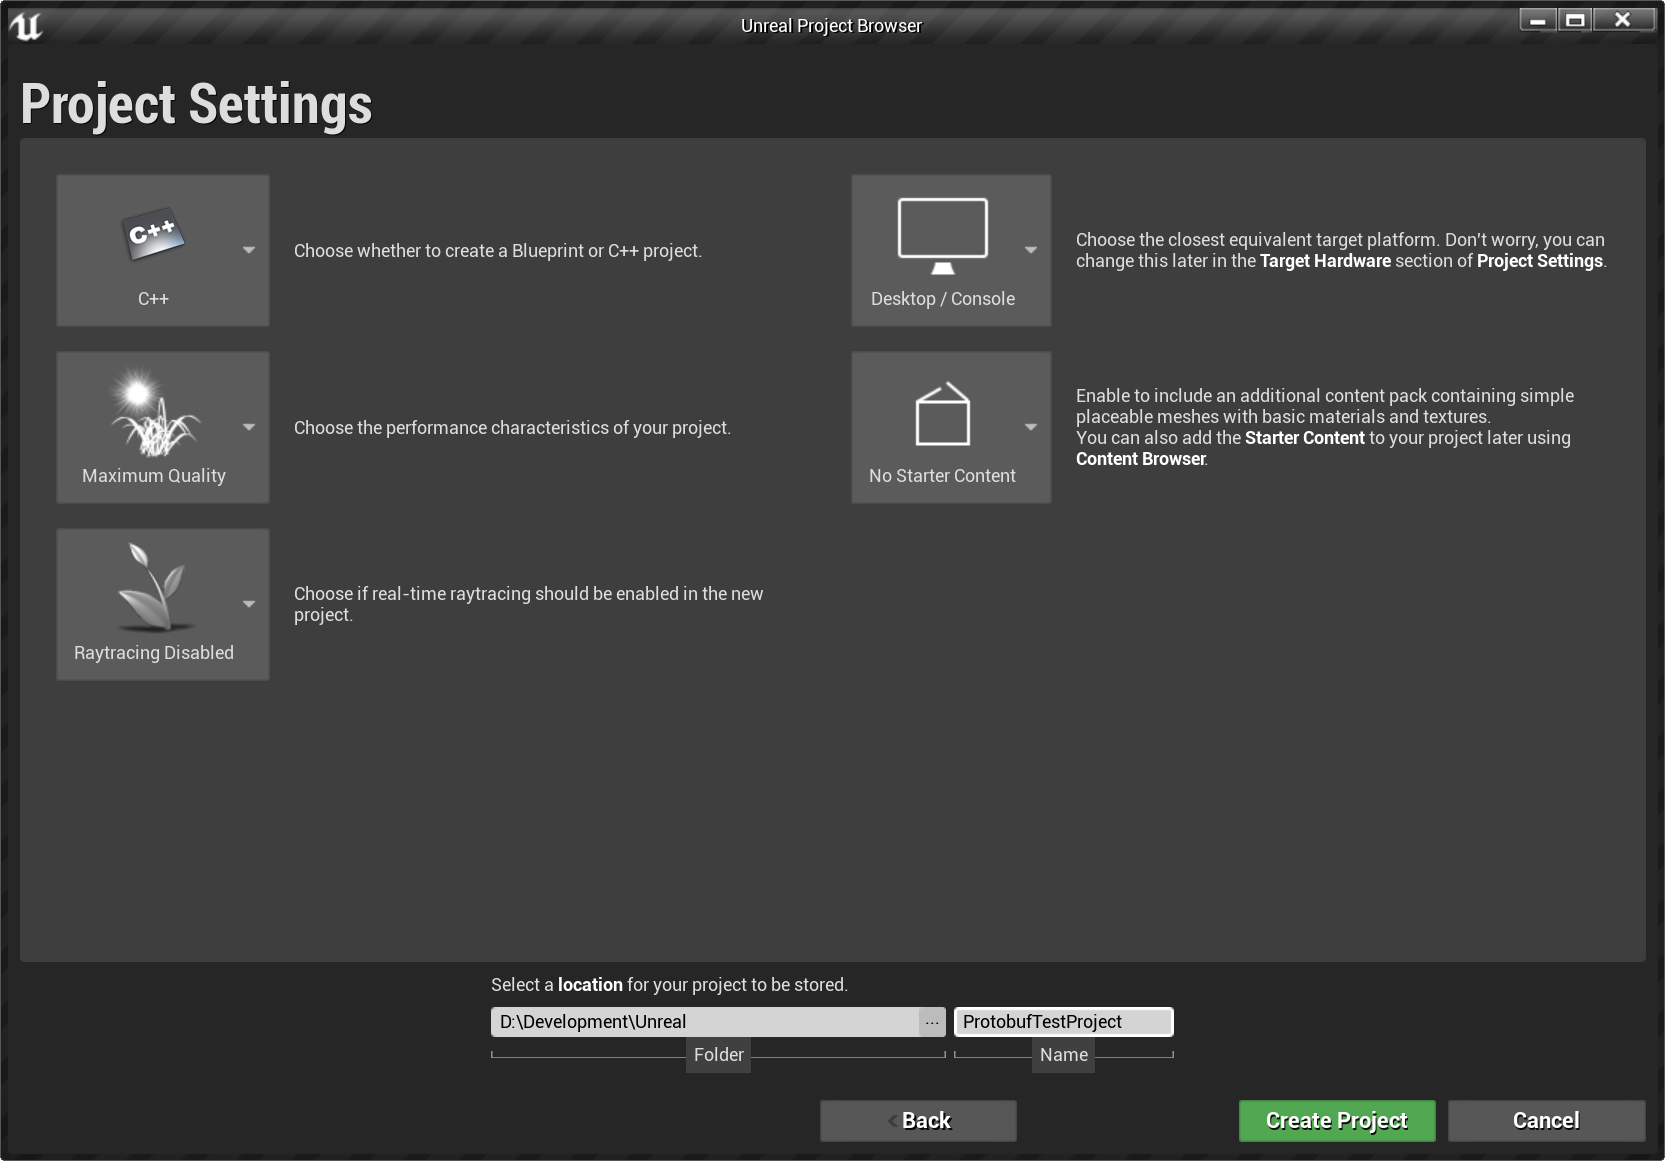
Even though we've chosen to use a C++ project we can, and will be, using blueprints. With our project created we need to make our plugin.
Making a plugin
The Unreal editor should have launched with our project open, from here we can start building up our plugin.
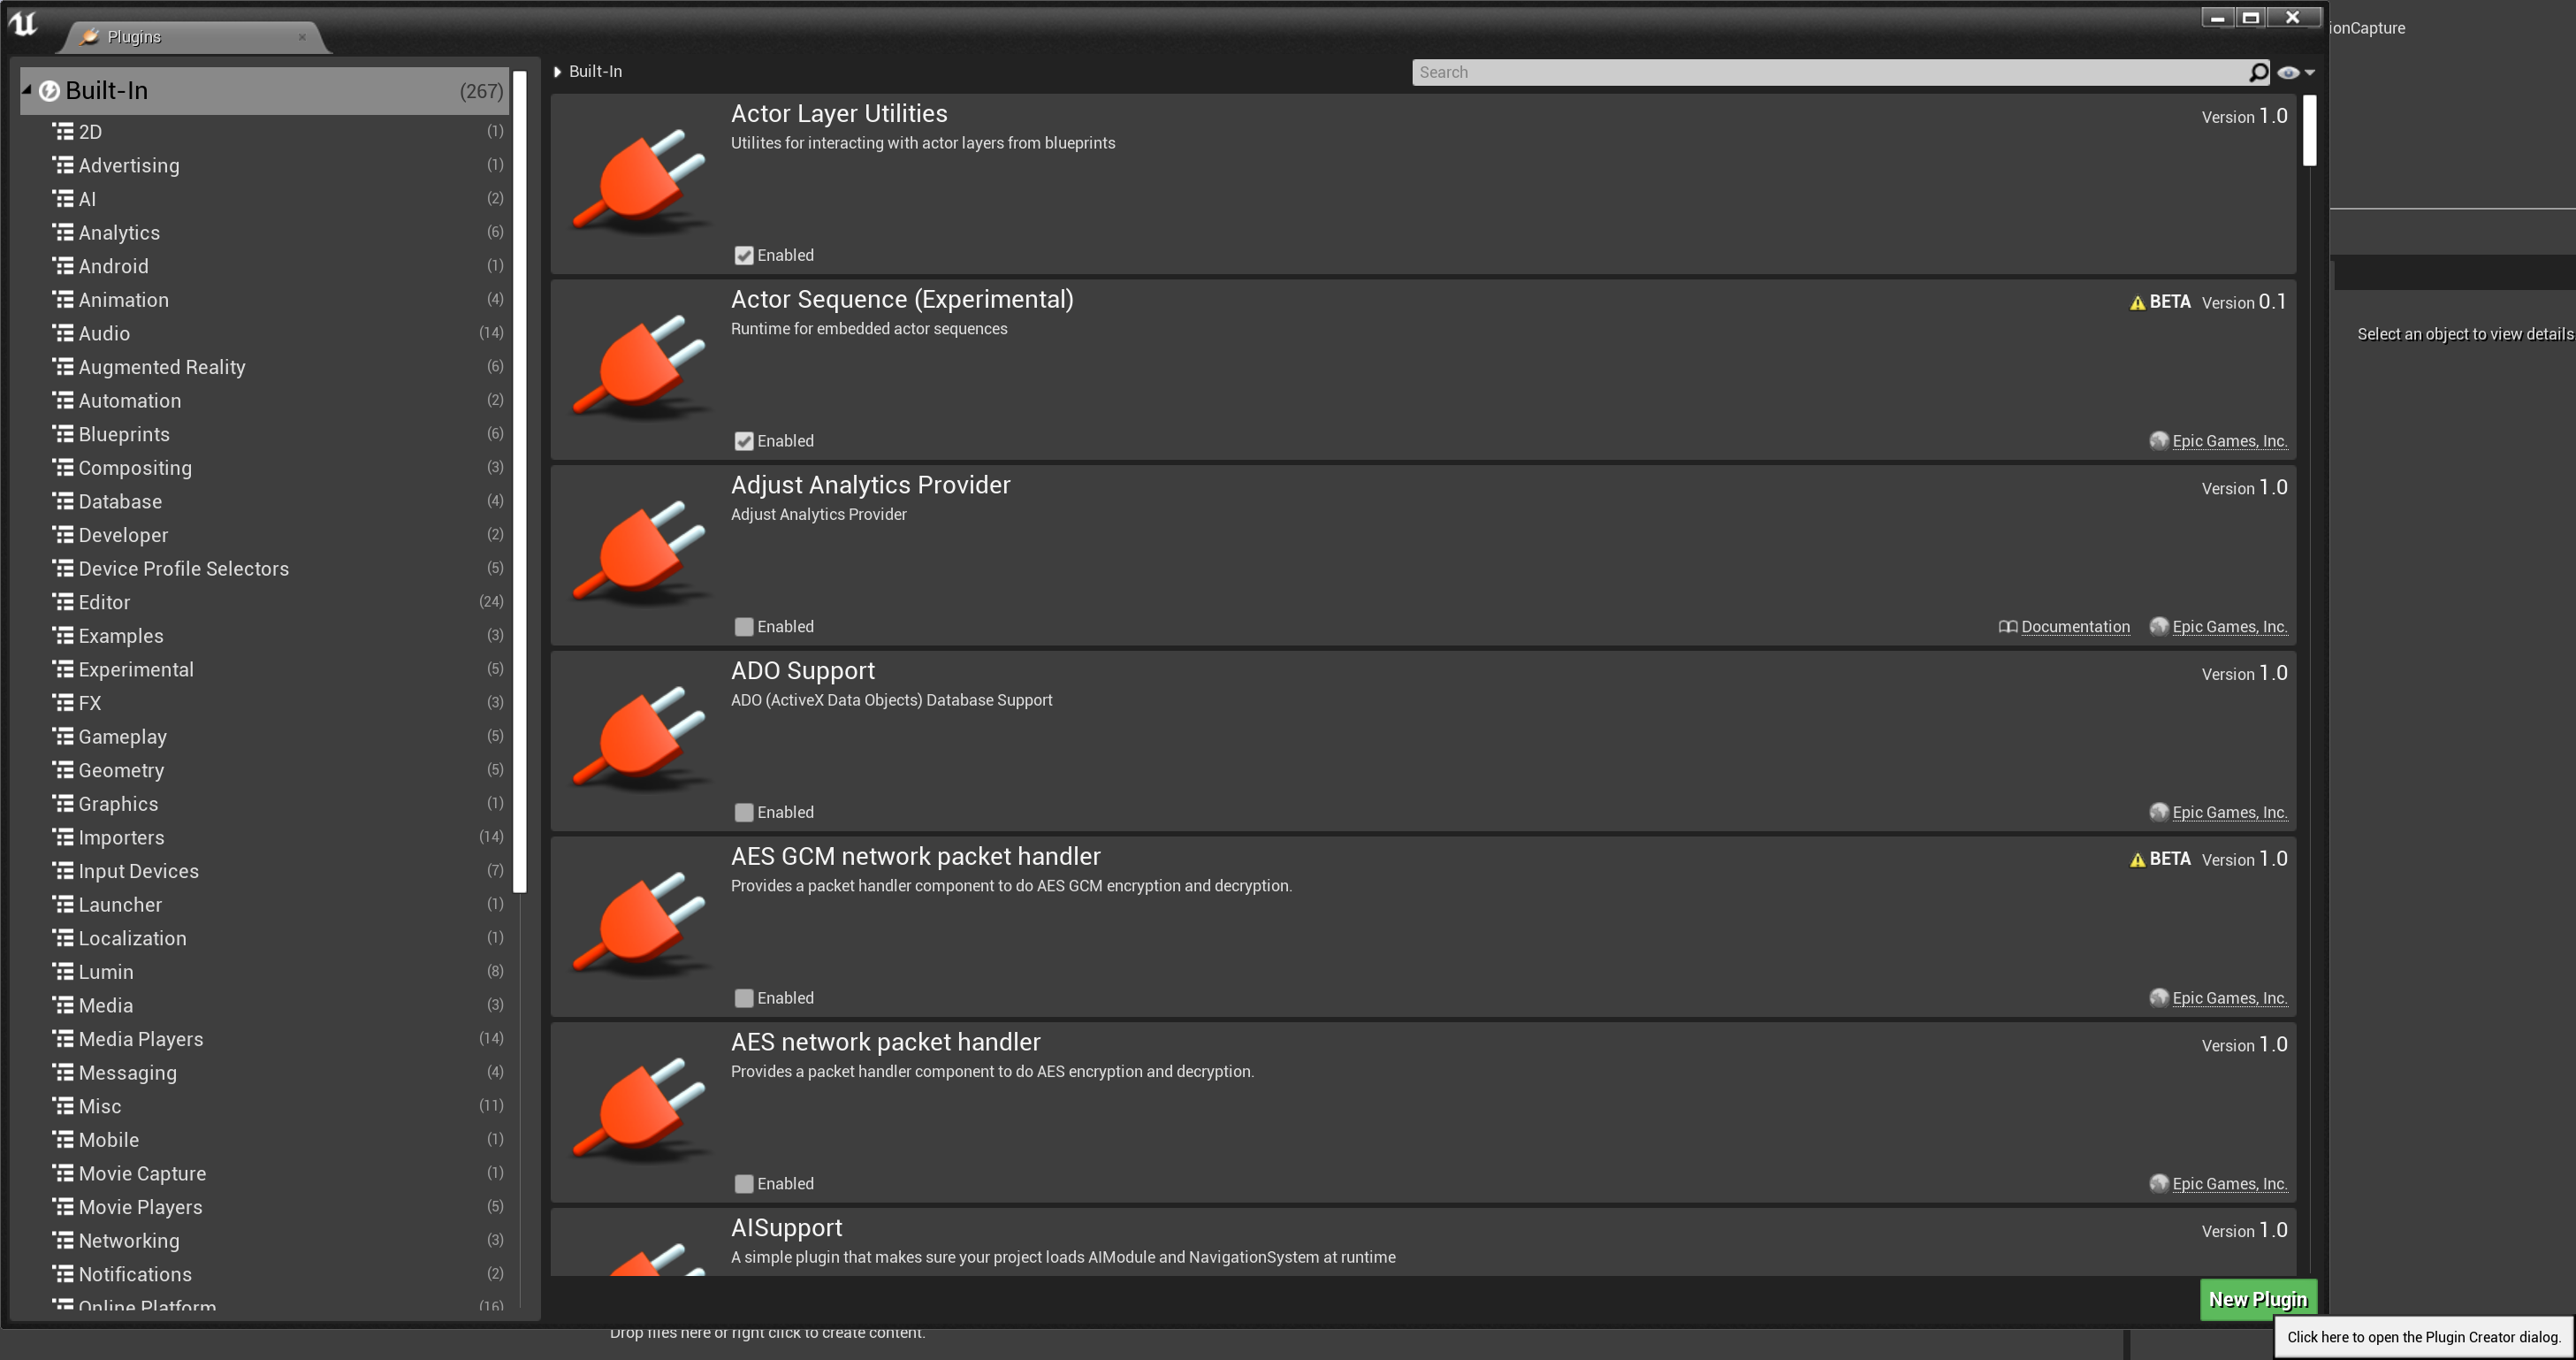
- From the menu bar go to
Edit -> Plugins
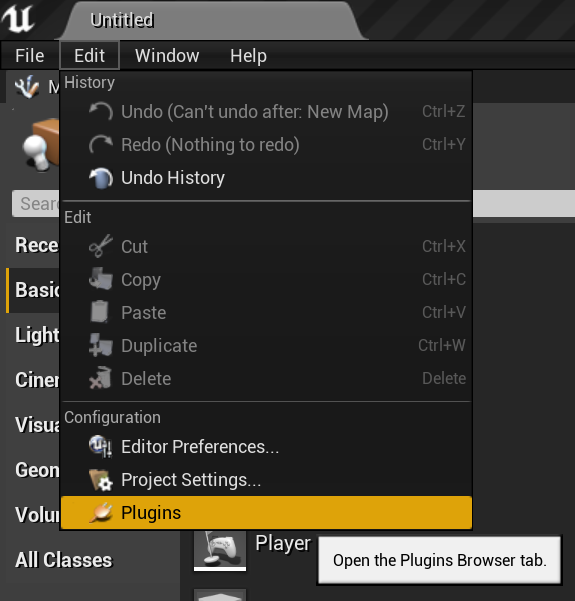
- Click on New Plugin
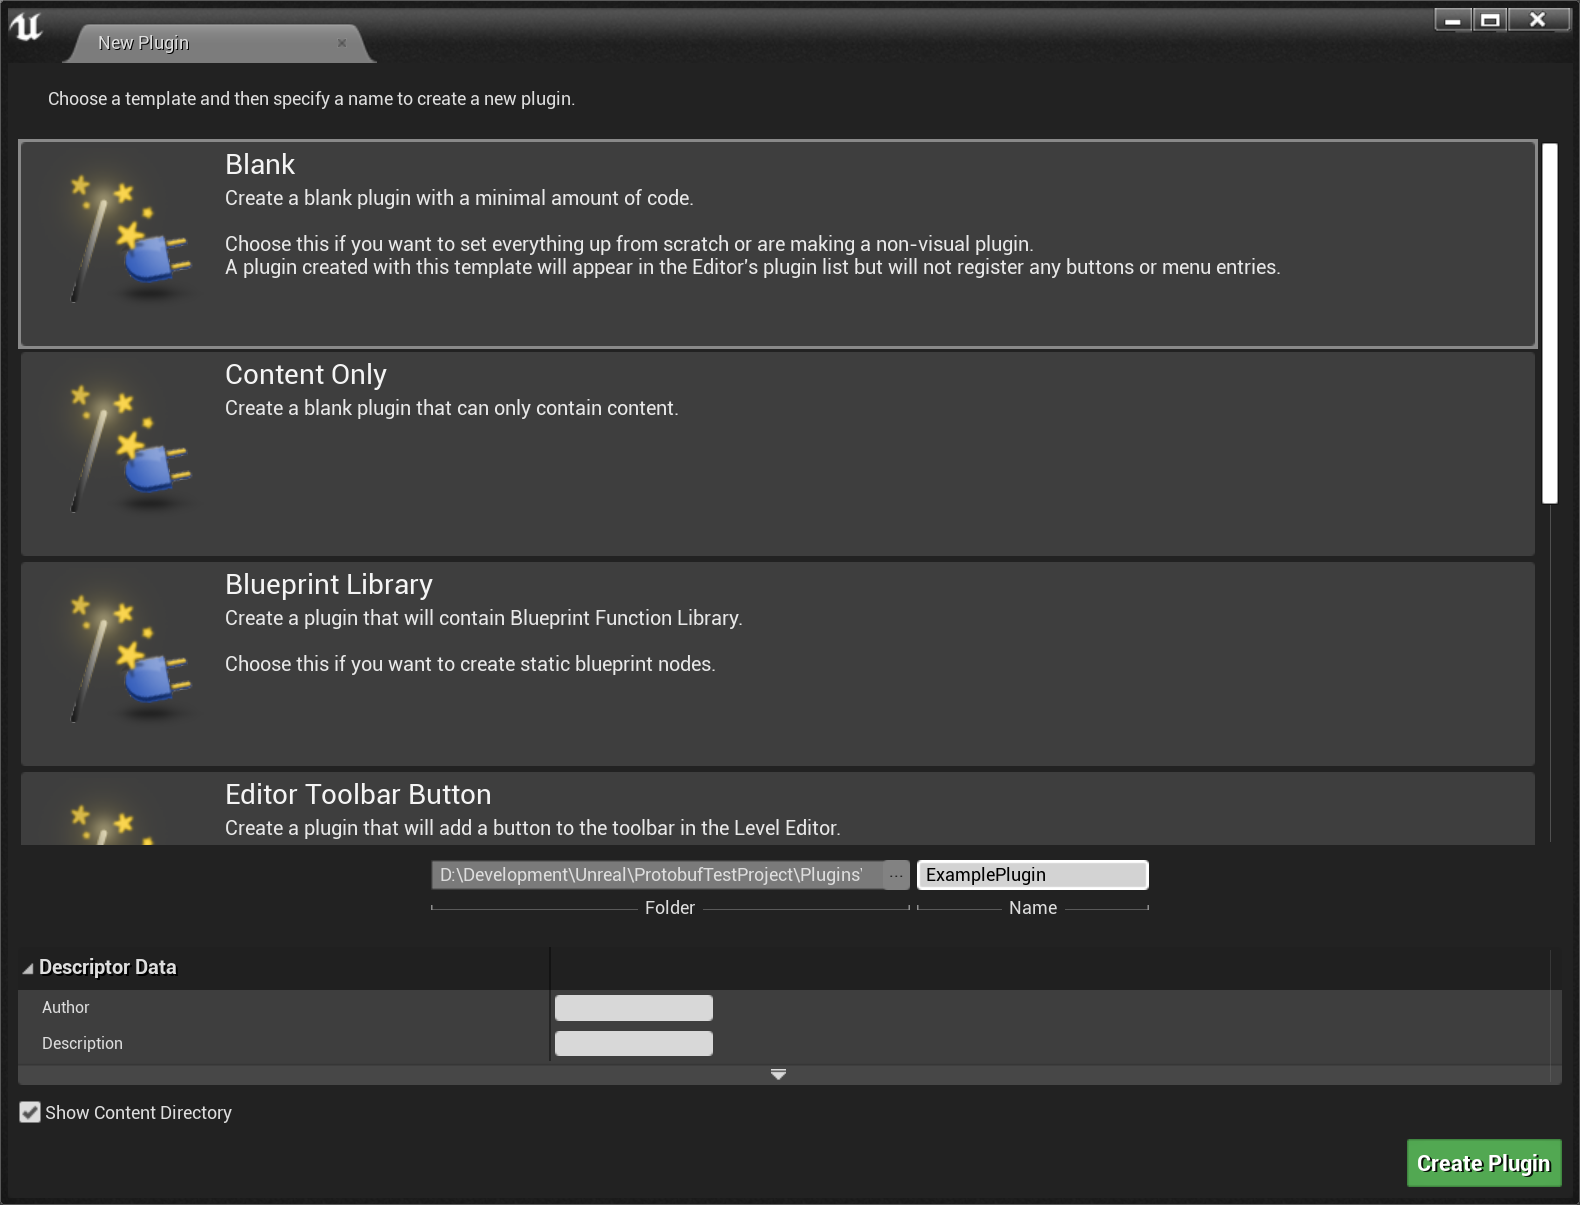
- Select the Blank template
- Name the plugin
ExamplePlugin
If you want you can name the plugin something else, in my case, for Yarn Spinner, I named the plugin YarnSpinner, but for this blog I'll be sticking with ExamplePlugin.
- Click Create Plugin
After a brief moment the plugin will be created and Visual Studio will launch with our project and plugin loaded as a solution and ready to modify.
- Visual Studio always launches behind Unreal, so
alt+tabover to Visual Studio.
When you get Visual Studio to the forefront it will have a warning message about how the solution has been modified outside of Visual Studio and needs to be reloaded.
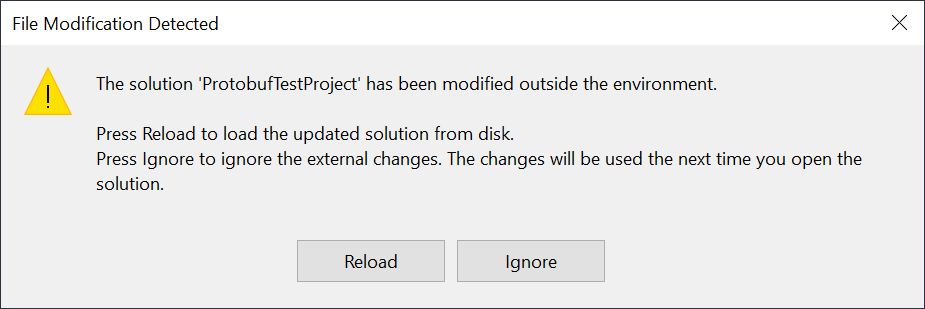
- Click Reload
With that done we can take a look at the structure of our plugin.
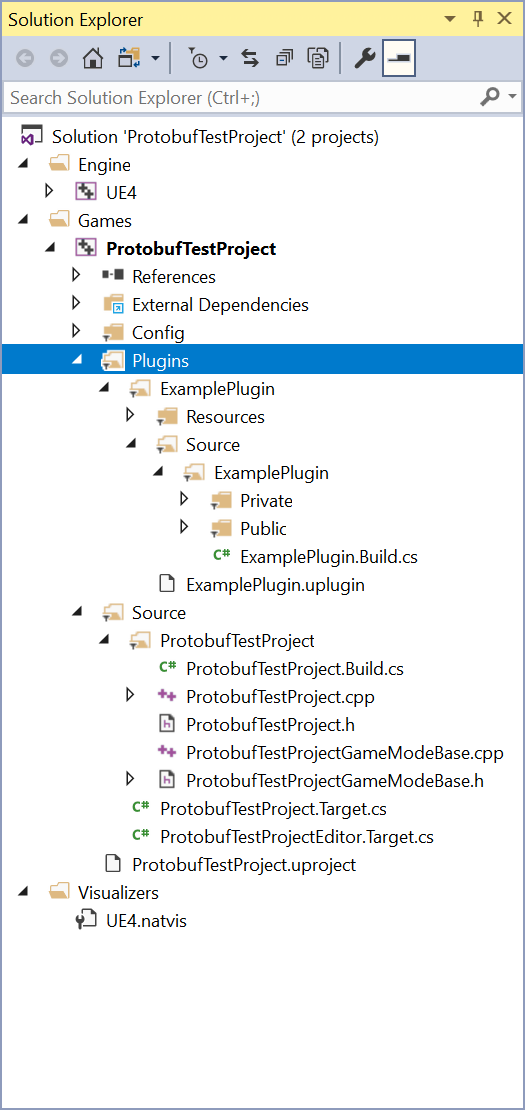
We've got two main points where our code lives (or will live), the Sources folder and the Plugins folder.
The Sources folder is where we put project specific code and we won't be adding anything in there.
The Plugins folder is our main point of contact and goes into lower folders for the plugin itself in the ExamplePlugin folder.
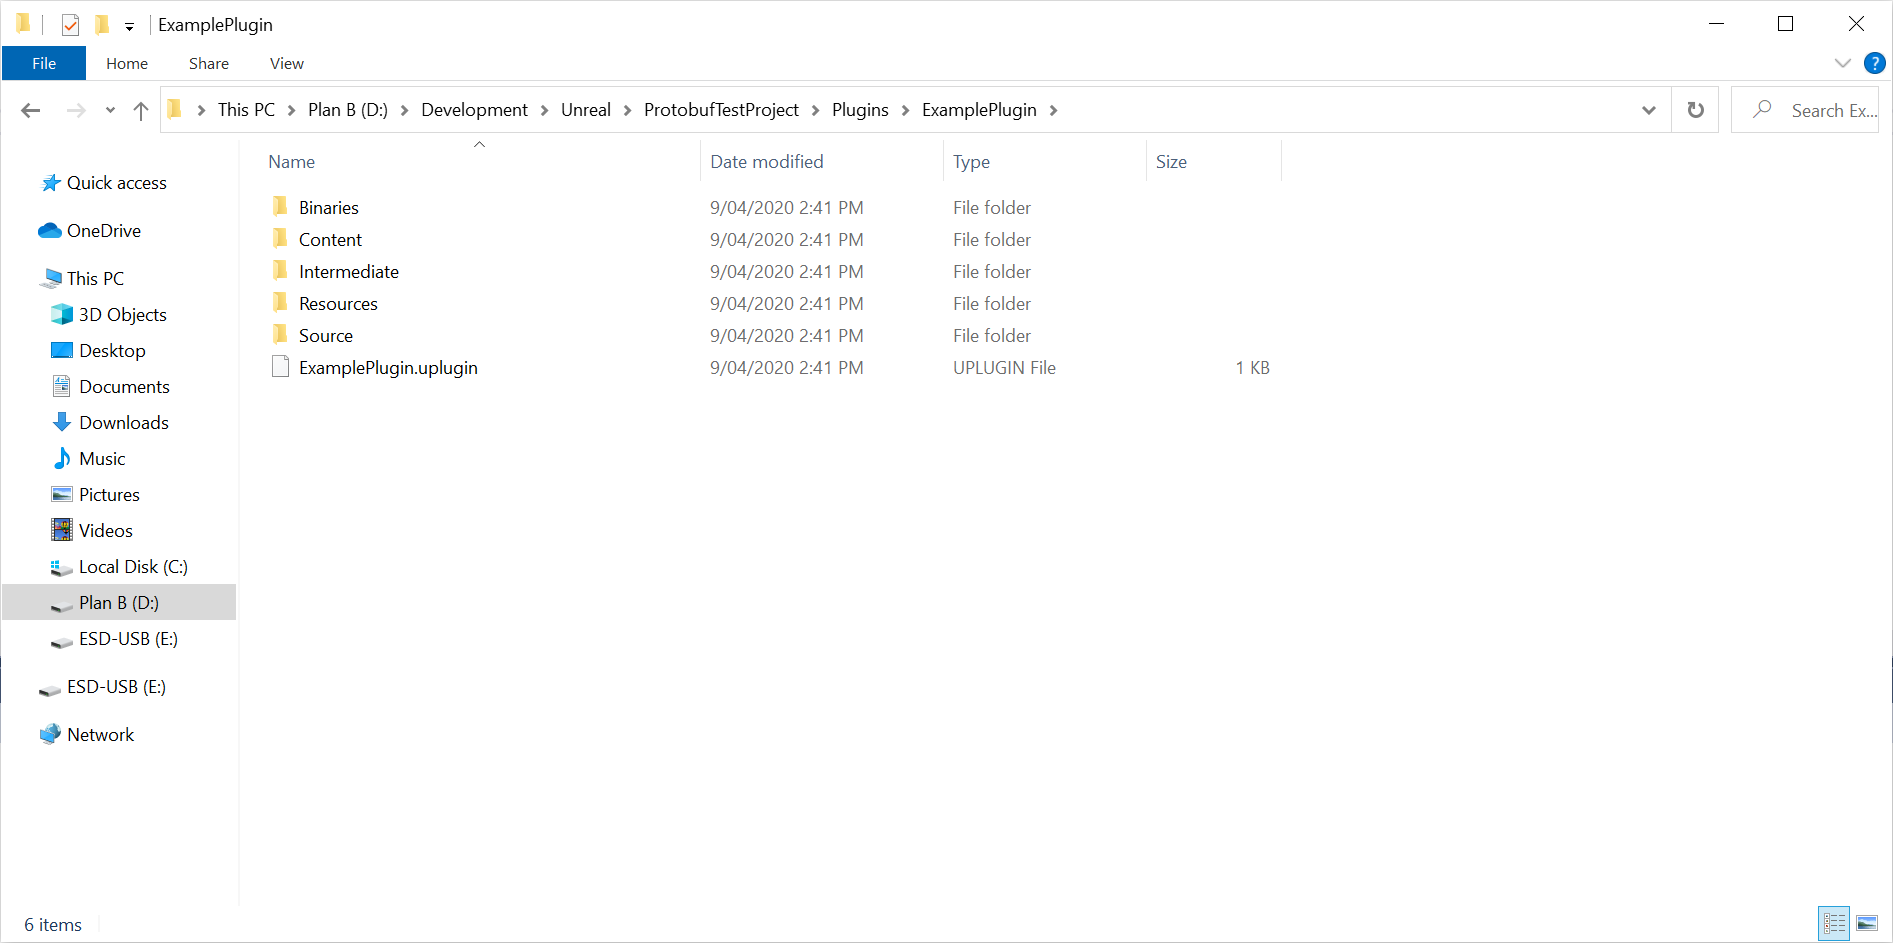
If you navigate into the ExamplePlugin folder you'll find the Sources folder for the plugin and inside of that another ExamplePlugin folder (so D:\Development\Unreal\ProtobufTest\Plugins\ExampleProject\Plugins\ExamplePlugin\Sources\ExamplePlugin in my case).
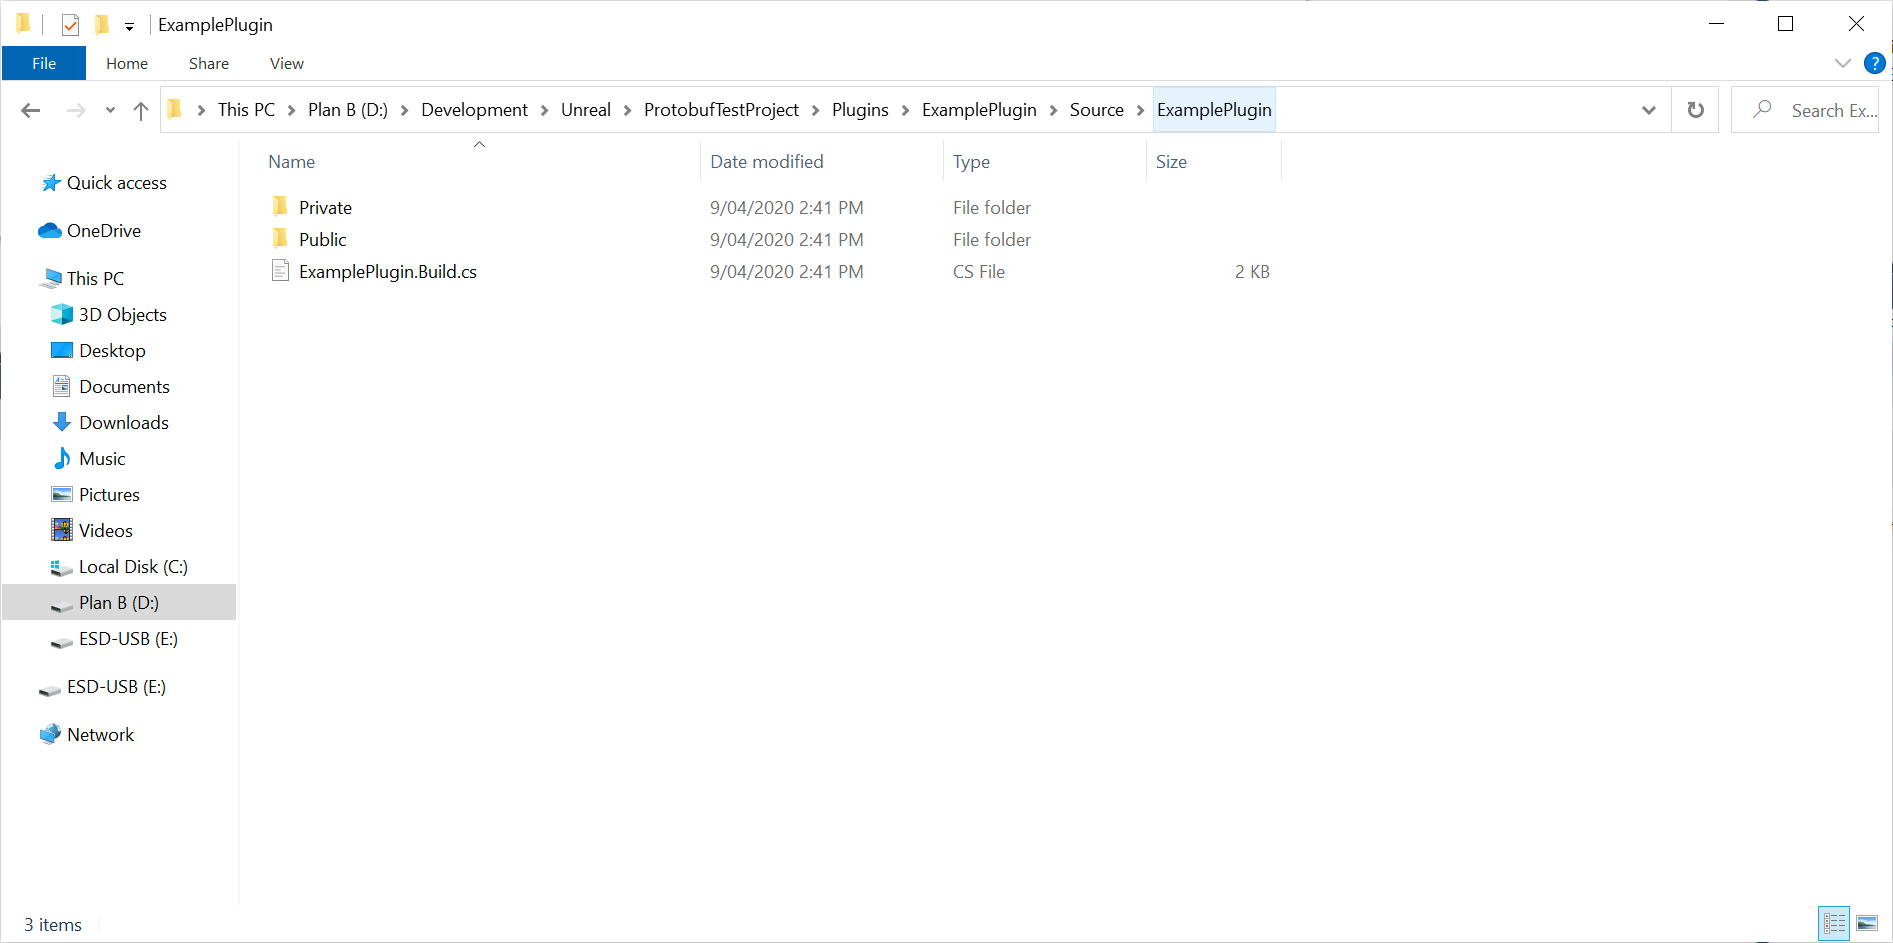
This was something that initially threw me off, why is there another folder?
Assuming I understand UE4 correctly, this is the folder for the ExamplePlugin module, and where all our code for that will go.
Our ExamplePlugin plugin will use this module as part of it, confusing right?
I kind of wish Epic would rename the module something like ExamplePluginModule instead of just naming it the same as the plugin, but oh well.
Nonetheless, inside this folder is the ever so important ExamplePlugin.Build.cs file.
We'll talk a little more about this file in a moment and what it does and controls but just for now know that this file is what Unreal will use to link our module into the project.
If you don't have this Unreal won't see your module and won't know how to build it or present it to the rest of your project.
From my understanding of UE4 we don't need to do this as a plugin, or have this level of folder abstraction but my mind likes the separation.
If you aren't big on that you can probably just place everything into the Sources folder of your project (not the plugins) if that's more your jam.
Now we can move onto working with protobuf, but before we do that we need to clean up:
- Close Visual Studio
- Close Unreal editor
The reason we close both of these is because we are going to be manipulating the folder structure and this is much simpler to do without those open and then refresh them once we've got it all set up.
Building protobuf
Protobuf is a big project, around 150,000 lines of code, and it has its own rules and assumptions. This means building protobuf isn't exactly easy, neither will the protobuf way be directly compatible with the Unreal way. Unreal has some assumptions as to how libraries will be working and these are documented here. We need to meet these requirements, there is no other way around it.
What this means is we are going to have to build protobuf, we can't use any prebuilt versions of, or at least none that I could find.
There are heaps of ways of doing this and I tested a few different one and to cut a long story short I settled on vcpkg as the one that works the best for me.
If you've not used vcpkg before it is a library manager and build tool for C++ made by Microsoft.
The general philopshy behind it is you describe the triplet you want to build and vcpkg takes care of it from there.
Triplet are the config files for vcpkg and describe the CPU architecture, operating system, and runtime settings you want the build to have.
As an example a triplet might look something like x86-windows-static which is saying that for whatever package we want to build we want it built for the x86 CPU architecture (x86-windows-static), on Windows (x86-windows-static), and to have static CRT linkage for MSVC (x86-windows-static).
If you are curious about triplets the vcpkg website has a good docs writeup about them.
Not all triplet combinations are valid for all projects, but luckily for us the one we need for protobuf is. So let's build protobuf!
- If not done already, install
vcpkg - Open the Terminal
- Navigate to your
vcpkginstallation folder
In my case this required changing drive, and moving to my development folder:
d:
cd Development\vcpkg\
I imagine you'll have a different installation folder to which you'll navigate, but if not, woo vcpkg-installation-folder-buddy high-five!
⚠️ Because it had been so long since I last used the Windows terminal I had actually forgotten how to change drives!
- Build protobuf with the
x64-windows-static-mdtriplet:
vcpkg.exe install protobuf:x64-windows-static-mdThis will then shoot off on its own downloading and building the project, giving us the perfect opportunity to talk about the triplet (or should it be called a quadruplet?).
The first two parts (x64-windows-) specify we want it to be build for Windows on the x64 architecture which is most of Windows and more importantly what my computer is.
The next two components are the more interesting ones.
First, we are specifying (-static-) that we want the CRT to be linked into the library statically.
From my understanding of how Unreal works I don't think this should be necessary but when I made builds without it being statically linked I got a whole bunch of linker errors, so static it is.
If someone knows why this is the case, do let me know.
The final part (-md) is saying we want the library to be built as a multithreaded specific library, and this is a requirement of linking in 3rd party code into Unreal.
If you are after more information on the various build settings around MD, MT, MDd, etc, and the implications therein Microsoft has a decent discussion around what all this means.
For us because we need it to integrate with Unreal and Unreal requires MD, so MD it is.
⚠️ This will only work on x64 Windows builds of Unreal: If you want to use protobuf on different operating systems or architectures you will have to build a different version of the library!
Quick segue
There are heaps of ways of building C++ projects, and if you are confident enough just using Visual Studio or CMake you can likely handle all of this yourself without using something like vcpkg but I lack such bravado.
There is one really interesting project called UE4cli which has the ability to integrate with the conan build tool and can build targets for Unreal.
I initially started using it for this when I was doing most of my Yarn Spinner development on macOS.
I ran into some issues there with UE4cli that due to my lack of knowledge around conan and Unreal meant I couldn't fix them so I moved to Windows and vcpkg as I already knew how to use it.
In the future I want to check out UE4cli again because I think it's got the actual potential to avoid ever having to think about building 3rd-party libraries for Unreal.
Also, the dev for it was super nice on Github when he was helping me out!
Adding protobuf to our plugin
With protobuf built it is time to start adding it into our plugin. We are going to be adding it in as a 3rd party library into our plugin, making it its own module.
- In Explorer navigate to your plugins' (not the project's)
Sourcefolder
In my case that is at D:\Development\Unreal\ProtobufTestProject\Plugins\ExamplePlugin\Source.
- Create a
ThirdPartyfolder inside ofSource - Create a
protobuffolder inside ofThirdParty
Now we need to add in our protobuf build from vcpkg
- Open a new Explorer window and navigate to your
vcpkgfolder
In my case that is at D:\Development\vcpkg.
- Navigate into the
installed\protobuf_x64-windows-static-mdfolder
This folder has the version of protobuf we built earlier.
- Copy the
libandincludefolders from here - Back inside our plugins explorer window paste those folders into the
protobuffolder we made
You should now have a folder structure so that inside of PrototbufTestProject\Plugins\ExamplePlugin\Source there is both an ExamplePlugin folder and a ThirdParty folder.
Inside of that ThirdParty folder you should have a protobuf folder and inside of that folder you should have two folders, lib and include.
This is an awful lot of folders but it does need to be done in this way or else Unreal won't be able to find and link it all together. So it is worth putting in the time to make sure your plugin setup is identical to how I described. With that done we are almost finished with protobuf, and now need to make it so that Unreal can see it.
- Inside the
protobuffolder create a new text file - Name the file
protobuf.Build.cs
⚠️ The name is very important here: If you name it something else it won't work!
- Open
protobuf.Build.csinside Visual Studio (or your text editor of choice) and add the following code:
using UnrealBuildTool;
using System;
using System.IO;

public class protobuf : ModuleRules
{
    public protobuf(ReadOnlyTargetRules Target): base(Target)
    {
        Type = ModuleType.External;

        PublicSystemIncludePaths.Add(Path.Combine(ModuleDirectory, "include"));
        PublicIncludePaths.Add(Path.Combine(ModuleDirectory, "include"));

        if (Target.Platform == UnrealTargetPlatform.Win64)
        {
            PublicLibraryPaths.Add(Path.Combine(ModuleDirectory, "lib"));
            PublicAdditionalLibraries.Add(Path.Combine(ModuleDirectory, "lib", "libprotobuf.lib"));
        }
        else
        {
            throw new Exception("Currently " + Target.Platform.ToString() + " is unsupported");
        }

        PublicDefinitions.AddRange(
            new string[]
            {
                "GOOGLE_PROTOBUF_NO_RTTI=1",
                "GOOGLE_PROTOBUF_USE_UNALIGNED=0"
            });
    }
}
This code does a few things so it is worth quickly going through it. At the highest level, it is declaring a new module called protobuf and then configuring how that module works.
Going into a bit more detail, first we are telling Unreal that it will need to make sure to search through the include folder for header includes.
Without this you wouldn't be able to use any of the various protobuf header files, and while we won't be using them directly, any protobuf files we generate will still need them.
We need to do this because Unreal has full control over the build process and just manually putting the path to files directly in your #include's won't work.
I assume under the hood UnrealBuildTool and UnrealHeaderTool are rearranging the folder and file structure as it sees fit, which means we have to tell it about the folders it needs to allow searching upon.
Then we do a quick check to see if we are on Windows or not. Because we only built protobuf as a Windows library if we aren't on Windows we will just throw an exception and halt the process. If we are on Windows though (like I was when I wrote this) then we add the path to our built out libraries. I hope that it shouldn't be too tricky to build protobuf for macOS or linux, and adapt the library loading code from Windows, I just haven't tried yet.
Finally we are setting two flags for protobuf to obey. We are disabling runtime type information, because it uses reflection and that's a no-no. The second flag I don't fully understand, but I had some linker errors without it and I noticed a few people had mentioned in passing to disable it, and disabling it fixed my issues. I'm assuming based on its name we are forcing protobuf to align its data in a particular fashion, to pack out memory in a specific way. Unsure as to why that matters here though. If people have more insight into what that flag does and why its important in this situation let me know.
With this file created and filled out Unreal can now link in protobuf for use in our plugin.
Integrating Protobuf With Our Plugin
Luckily for us getting our ExamplePlugin module to be able to see protobuf is easy.
- Navigate to the ExamplePlugins module folder
In my case this was at D:\Development\Unreal\ProtobufTestProject\Plugins\ExamplePlugin\Source\ExamplePlugin
- Open the
ExamplePlugin.Build.csfile - Add the following line to the
PrivateDependencyModuleNamessection:
"protobuf"You need to place it below the others being added as part of the AddRange function.
Epic have very kindly put a line that says // ... add private dependencies that you statically link here ... which helps find the right area.
Once done your PrivateDependencyModuleNames section should look like the following:
PrivateDependencyModuleNames.AddRange(
    new string[]
    {
        "CoreUObject",
        "Engine",
        "Slate",
        "SlateCore",
        // ... add private dependencies that you statically link with here ...
        "protobuf"
    });
And just like that we've included protobuf into our module! Of course it doesn't actually do anything yet, but we're getting to it.
It's worth just quickly seguing here to talk about protobuf-lite. Protobuf-lite is a trimmed down runtime of protobuf with less features but designed for more restrictive environments. Protobuf-lite looks like it might be a better fit for the needs of video games than regular protobuf. While I've not tested this protobuf-lite should just work as a drop-in replacement for the full protobuf by changing which lib file it is targetting. Much like with FlatBuffers vs. protobuf, there is just less information around there around UE4 and protobuf-lite and is currently in the "future Tim" basket.
Creating some protobuf files
Protobuf works by defining a schema for your data and then you use the protoc compiler tool (which vcpkg has helpfully installed for us already) to generate code in your desired programming language that can serialise and deserialise data that matches the schema.
This means we will need to do a few things, write a data schema, generate some C++ code for that schema, and then finally include that into our plugin.
Our data schema
We need to define a data scheme in the protobuf language that will describe the structure of data we want our game to understand. Because protobuf is such a large and well documented project we won't go into too much detail describing the message structure here. If you are curious as to exactly what all this means, check out the official language specification page.
- Create a new text file and name it
Doggo.proto - Add the following code to the protobuf file:
syntax = "proto3";

message Doggo
{
    string name = 1;
    int32 age = 2;
    float goodBoyness = 3;
}

message Kennel
{
    repeated Doggo goodBoys = 1;
    string name = 2;
}
This is our schema, we define a new message type (protobuf's term for a data structure) for a Doggo.
Each Doggo will contain their name (a string), their age (an integer), and a value to indicate how much of a good boy they are (a float).
⚠️ If you're concerned about dataset being biased towards dude dogs, fear not: The good boyness of a dog is immaterial to their gender.
We then define a new message type which is a Kennel which just contains an array of Doggos and the name of the kennel.
This is intentionally kept simple but protobuf can describe pretty much any level of information you so desire.
⚠️ Don't worry about those numbers next to the message fields: While it might look like we are setting a Doggos age here to two, we aren't, this is just part defining protobuf message.
Generating our C++ code
With our schema ready we can now use it and the protobuf compiler to generate some C++ code which will be able to read and understand Doggos and Kennels.
⚠️ Do not treat protobuf generated classes as normal C++ classes: While the code generated contains lots of classes you should treat them more akin to simple structs. Don't inherit or extend them, they are data only!
- Open Terminal
- Navigate to where
vcpkginstalled the protobuf compiler
In my case that looked like this:
D:
cd Development\vcpkg\installed\x64-windows-static-md\tools\protobuf
Inside here you will find the protoc.exe protobuf compiler which will be generating our code for us.
Now to use this tool we will need to know the absolute paths for our input file (Doggo.proto), it's folder, and where we want our output to go.
In my case I saved my Doggo.proto file in the same directory as my module, so D:\Development\Unreal\ProtobufTest\Plugins\ExamplePlugin\Source\ExamplePlugin\Public\Doggo.proto and I will be exporting the generated code to the same folder, so in my case D:\Development\Unreal\ProtobufTest\Plugins\ExamplePlugin\Source\ExamplePlugin\Public
- Run the protobuf compiler using the following command:
protoc.exe --cpp_out=D:\Development\Unreal\ProtobufTest\Plugins\ExamplePlugin\Source\ExamplePlugin\Public --proto_path=D:\Development\Unreal\ProtobufTest\Plugins\ExamplePlugin\Source\ExamplePlugin\Public Doggo.protoThere are four parts to this worth just quickly pointing out.
The first protoc.exe is the compiler itself.
Next the --cpp_out= is us telling the compiler where we want the C++ files it generates to be saved.
This is also where you can configure for which language you want protobuf to generate files, for example if we'd used the --csharp_out flag instead we'd have gotten C# code.
--proto_path= tells the compiler the path of where our proto files are stored, and Doggo.proto is telling the compiler we want to generate code for that file.
⚠️ As a rule of thumb you don't want things public unless you've no choice: While writing this I realise in hindsight the generated files don't really need to be public. I just did it that way while figuring all this stuff out, but hindsight is perfect and I had already written the code for this and I'm not rewriting this monster blog!
If you look inside the public folder you'll see two new files, Doggo.pb.h and Doggo.pb.cc, these are our generated C++ files.
Normally you shouldn't touch these files unfortunately this is another situation where the Unreal Way and Protobuf Way conflict so we are going to have to tweak the generated files.
- Open
Doggo.pb.cc - Add the following code to the very top of the file:
#pragma warning (disable : 4800)
#pragma warning (disable : 4125)
#pragma warning (disable : 4647)
#pragma warning (disable : 4668)
#pragma warning (disable : 4582)
#pragma warning (disable : 4583)
#pragma warning (disable : 4946)
#pragma warning (disable : 4577)

#ifdef _MSC_VER
#include "Windows/AllowWindowsPlatformTypes.h"
#endif- At the very bottom of the file add the following code:
#ifdef _MSC_VER
#include "Windows/HideWindowsPlatformTypes.h"
#endif
We just added a fair bit of code so let's quickly go through it.
The first part we added (all the #pragma stuff) disables some warning checking on the file.
We have to do this because protobuf code generates some warnings and Unreal (correctly in my mind) converts warnings into errors.
This halts the compilation and build process.
Normally you should be fixing the warnings instead of just suppressing them but because this isn't our code and I don't want to vendor protobuf, suppression it is.
With the other two parts first up in the top one we're creating a quick check if we are on Windows, and if so we need to include the Windows data types. I'm not fully sure why we need these: it could be a protobuf thing, or an Unreal thing, or a combination of both. It might have something to do with Unreal not being huge into the STL and Protobuf being quite good friends with it. Regardless we need them, hence the inclusion. At the bottom though we turn them back off because we only need them for our protobuf code, not all over the place.
With that done we are very close, and all that's left is to quickly add some code so we can make sure they are hooked up correctly.
⚠️ This is test only code: What we are about to write is to make sure we've hooked it all up correctly and we should delete it once we've made sure it all works. Don't leave this code in your project!
- Open
ExamplePlugin.cpp - Include our protobuf header:
#include "Doggo.pb.h"- Inside the
StartupModulemethod add the following code:
Doggo goodBoy;
goodBoy.set_name("Bork Bork");
goodBoy.set_age(3);
goodBoy.set_goodboyness(1);

FString name = FString(goodBoy.name().c_str());

UE_LOG(LogTemp, Warning, TEXT("Who's a good boy? %s is!"), *name);
Here we are building a new Doggo and then logging it.
- Build the solution and launch the project in the Unreal Editor to see it in action.
If you don't have the output log open you can open it from the Unreal Editor menu bar, Window -> Developer Tools -> Output Log
- Filter the output log to only show the
LogTemplogs
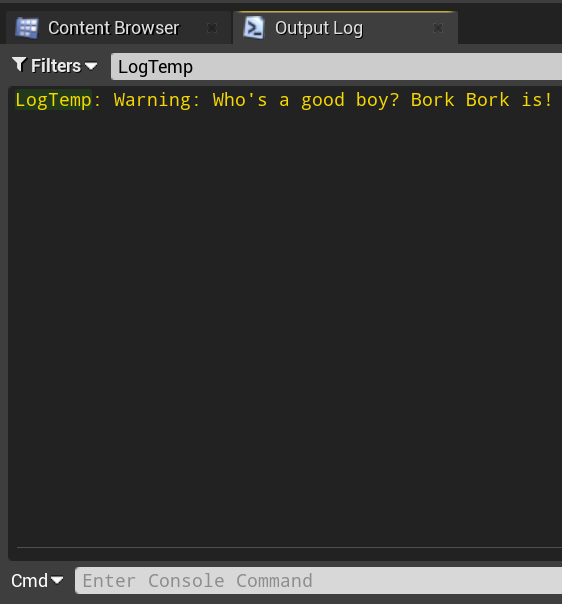
Tah-dah!
It's at this point in the story where most guides end and that irks me because we've only told half the story. Sure it is technically working, but in my mind you can't say something is useful without actually using it. So we are going to go the last few steps and wrap our protobuf into an asset, and then write some blueprint code that can use those assets. That said, if you are already comfortable in assets and blueprints in Unreal this is a good time to stop.
Using your protobuf
This last few bits are about creating some wrapper code to make using the protobuf a little bit easier.
We'll be wrapping the protobuf Kennel into an Unreal asset class, making a factory for it so we can have drag and drop support in the content browser, and writing a blueprint that uses the asset.
Making an asset
To get started we need an asset which will wrap around our protobuf datatype. If we wanted to we could work our way through the protobuf data at instantiation time and convert it into a raw C++ object but this feels unnecessary to me, protobuf is pretty lightweight. The advantage to doing this though is you won't need to write as many wrappers to get access to the data within. If you want to do this however a lot of the steps will be the same.
All of this section is inspired and in some parts based on the TextAsset example asset project, available under the BSD 3-Clause license. You should check it out if you are interested in assets in UE4.
- Create a new C++ Class from within the Unreal Editor
Right click on the content browser and select New C++ Class from the menu that appears.

Once that is a done the new class wizard menu will appear.
- Select the Show All Classes toggle
- Select the Object class at the top
- Click Next

- Name the class
KennelAsset - Choose the ExamplePlugin (Runtime) to make sure it goes into our module and not the game itself
- Select the Public toggle
- Click Create Class
This will create two new files called KennelAsset.h and KennelAsset.cpp, the header file will be inside the ExamplePlugin\Public folder, the other inside the ExamplePlugin\Private folder.
- Open
KennelAsset.h - Include the protobuf header file:
#include "Doggo.pb.h"For I'm sure what are good reasons, but are very annoying to me because I keep forgetting, you need to make sure that the last include is the KennelAsset.generated.h UE4 generated file.
I tend to just put some space around that include so I can add others above it as needed.
- Modify the
UCLASS()macro to add in support for blueprints:
UCLASS(BlueprintType, hidecategories = (Object))I'm still a little unsure exactly what this is doing, but you need it so you can use the asset in blueprints which is our end goal, so in it goes! Next we need to work out what features we want our asset to have so we can start implementing them. For this example we'll keep it pretty simple, we will want to have an array of the dogs names who are in the kennel. We'll also need a variable to hold onto our protobuf data which contains this information.
- Add the following code to the
UKennelAssetclass definition:
public:
    Kennel kennelData;
    TArray<FString> goodBoys();
The last thing we need is we will have to create a parse method so that when we've hooked up drop and drag support it has a method to call to deserialise the protobuf. This method will return a bool indicating the success or failure of the parsing.
bool parse(const uint8*& Buffer, size_t length);The finished header for our asset will look like the following:
#pragma once

#include "CoreMinimal.h"
#include "UObject/NoExportTypes.h"
#include "Doggo.pb.h"
#include "KennelAsset.generated.h"

UCLASS(BlueprintType, hidecategories = (Object))
class EXAMPLEPLUGIN_API UKennelAsset : public UObject
{
    GENERATED_BODY()

public:
    Kennel kennelData;
    bool parse(const uint8*& Buffer, size_t length);
    TArray<FString> goodBoys();
};
Implementing the asset
Time to start implementing our asset.
- Open
KennelAsset.cpp - Create the
goodBoysmethod implementation:
TArray<FString> UKennelAsset::goodBoys()
{
    TArray<FString> nodes;

    for (auto& dog : kennelData.goodboys())
    {
        nodes.Emplace(FString(dog.name().c_str()));
    }

    return nodes;
}
Here we are looping through all of the dogs inside the kennel, getting their name, and adding that name to a TArray which we then return at the end.
- Create the
parsemethod implementation
bool UKennelAsset::parse(const uint8*& Buffer, size_t length)
{
    if (kennelData.ParseFromArray(Buffer, length))
    {
        UE_LOG(LogTemp, Warning, TEXT("Kennel parsing success"));
        return true;
    }
    else
    {
        UE_LOG(LogTemp, Warning, TEXT("Kennel parsing failed"));
        return false;
    }
}
This method is deceptively simple because protobuf itself is doing all the actual heavy lifting.
There is a built in method in protobuf called ParseFromArray which takes in a buffer and the length of the buffer and can then convert that into a valid datatype.
If this method fails it returns false, we are using this so that we can then return if this worked or not.
I've also chucked in a bit of logging because during development you want to know immediately if your parsing has failed to help track down bugs.
Where does the buffer come from? From the factory we are about to write.
Making a drag and drop factory
Unreal requires you to make a factory to add in drop and drag support but there's a bit of an issue with this, the base factory objects we will need to inherit from are all part of the Unreal editor classes.
You can't mix and match runtime modules (like our ExamplePlugin) and editor modules, so we are going to have to make a new module.
A special shoutout to Alex Stevens for pointing this out to me, this was a source of a lot of confusion that he immediately cleared up.
Turns out people who know more than you are useful to know, who knew?
We'll be building this module in a similar fashion to how we made our protobuf module.
- Inside of the
Sourcesfolder for our plugin create a new folder calledExamplePluginEditor
In my case this means the folder I created went in D:\Development\Unreal\ProtobufTest\Plugins\ExamplePlugin\Source.
- Inside of the
ExamplePluginEditorfolder create two new folders,PrivateandPublic.
These will hold our code for the module.
- Inside of the
Privatefolder create a new folder calledFactories
This folder will hold the code for our factory.
- Inside of the
ExamplePluginEditorfolder create a new text file calledExamplePluginEditor.Build.cs - Add the following code to the
ExamplePluginEditor.Build.csfile:
using UnrealBuildTool;

public class ExamplePluginEditor : ModuleRules
{
    public ExamplePluginEditor(ReadOnlyTargetRules Target) : base(Target)
    {
        PCHUsage = PCHUsageMode.UseExplicitOrSharedPCHs;

        DynamicallyLoadedModuleNames.AddRange(
            new string[] {
                "AssetTools",
                "MainFrame",
            });

        PrivateIncludePaths.AddRange(
            new string[] {
                "ExamplePluginEditor/Private",
                "ExamplePluginEditor/Private/Factories",
            });

        PrivateDependencyModuleNames.AddRange(
            new string[] {
                "Core",
                "CoreUObject",
                "Engine",
                "ExamplePlugin",
                "UnrealEd",
                "protobuf"
            });

        PrivateIncludePathModuleNames.AddRange(
            new string[] {
                "AssetTools",
                "UnrealEd",
            });
    }
}
This is a build file much like what we created earlier for our protobuf module, the difference is here we are including a bunch of different libraries and includes because we need access to the editor functionality instead of the runtime.
That said, we are also including protobuf and ExamplePlugin because we will need access to their functionality.
One thing that is different from before is that inside of our PrivateIncludePaths we are including folders based on a hierarchy.
We don't need to go to this level considering we've only got a single factory in here but because this code is based on my code for YarnSpinner where I do want that level of structure we get it here too.
- Inside of the
Factoriesfolder create two new filesKennelAssetFactory.handKennelAssetFactory.cpp - Open
KennelAssetFactory.hand add the following code:
#pragma once

#include "Factories/Factory.h"
#include "UObject/ObjectMacros.h"
#include "KennelAssetFactory.generated.h"

UCLASS(hidecategories=Object)
class UKennelAssetFactory : public UFactory
{
    GENERATED_UCLASS_BODY()

public:

    virtual UObject * FactoryCreateBinary
    (
        UClass * InClass,
        UObject * InParent,
        FName InName,
        EObjectFlags Flags,
        UObject * Context,
        const TCHAR * Type,
        const uint8 *& Buffer,
        const uint8 * BufferEnd,
        FFeedbackContext * Warn,
        bool & bOutOperationCanceled
    ) override;
};
Here we are declaring that we will be making a new subclass of UFactory and will be overriding one factory, FactoryCreateBinary which will be called by Unreal editor when a file of the approriate type is dragged into the content browser.
There are a few different FactoryCreate methods to choose from, and I knew I'd need to choose one that provides a binary buffer but sadly the docs for most of these methods they aren't exactly well documented.
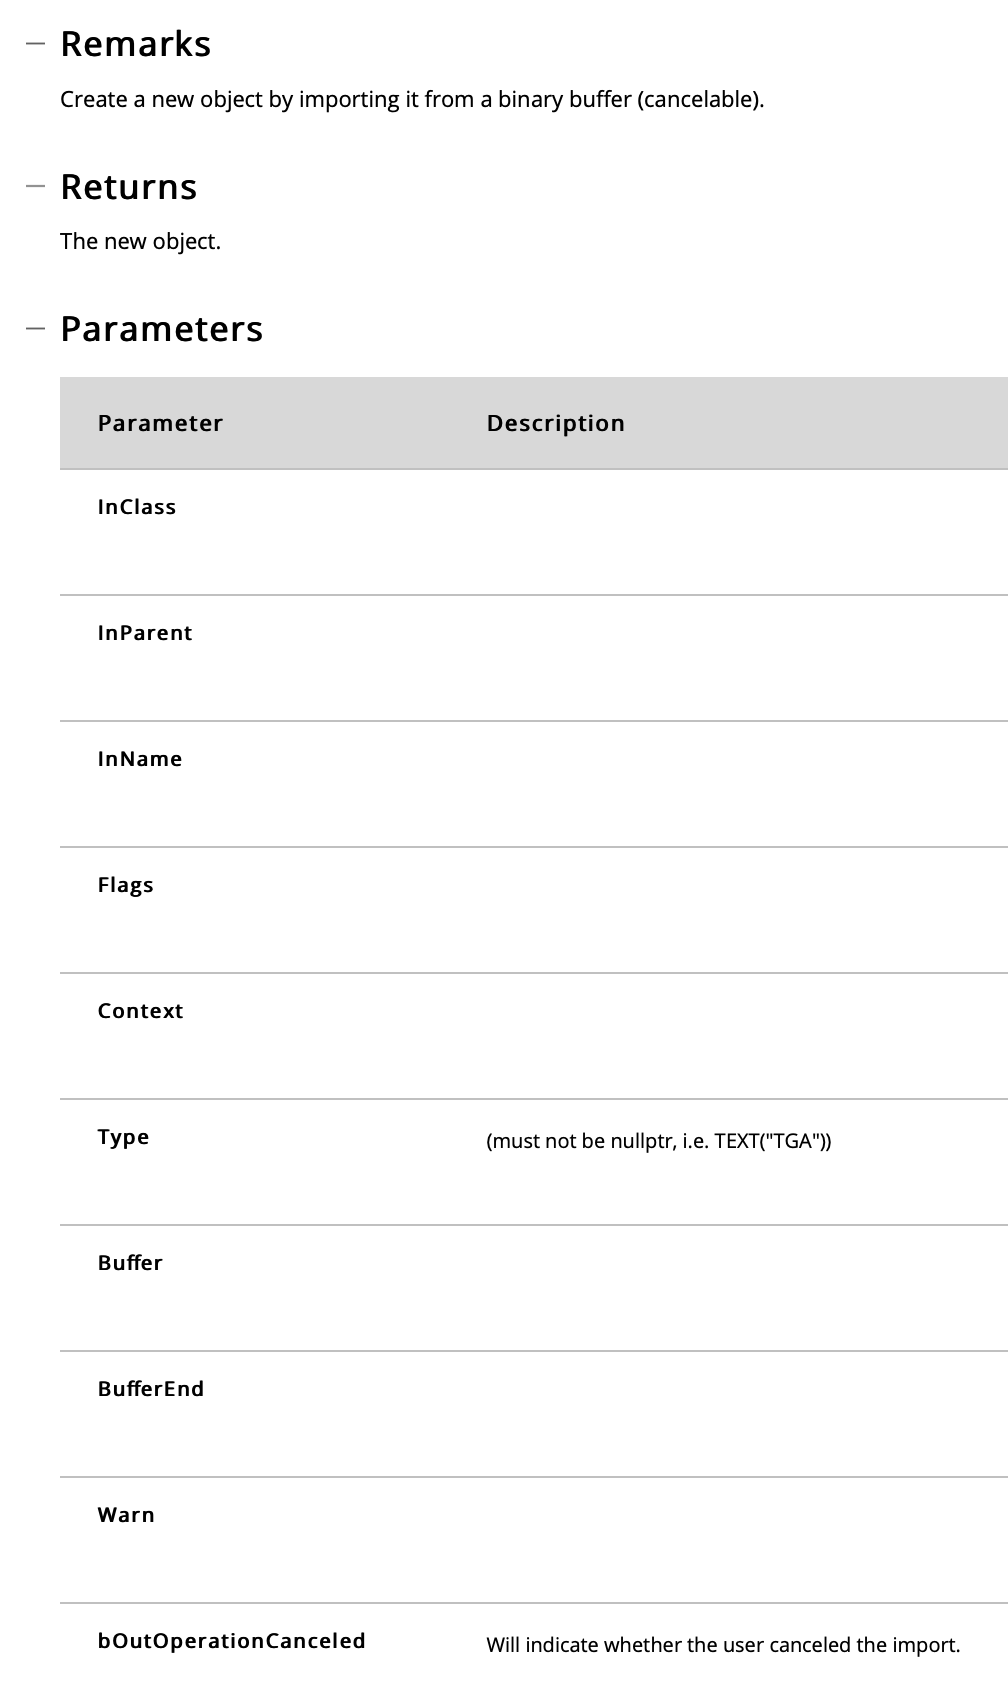
Nonetheless this one appears to be the one we want because, if I'm understanding the parameters correctly, we can set the bool input to false if the protobuf parsing fails.
I could be wrong about this though, if someone's got more insight into this, let me know.
- Open
KennelAssetFactory.cppand add the following code:
#include "KennelAssetFactory.h"
#include "Containers/UnrealString.h"
#include "KennelAsset.h"

UKennelAssetFactory::UKennelAssetFactory( const FObjectInitializer& ObjectInitializer ) : Super(ObjectInitializer)
{
    Formats.Add(FString(TEXT("knl;")) + NSLOCTEXT("UKennelAssetFactory", "FormatKennel", "Compiled Kennel File").ToString());
    SupportedClass = UKennelAsset::StaticClass();
    bCreateNew = false;
    bEditorImport = true;
}
This constructor adds in support for the specific file formats and set up the UKennelAsset class is what this factory will be creating instances of.
Specifically we are telling Unreal Editor that anything that has the .knl file extension will be connected into this factory.
This isn't an existing format, just one that I've made up that will be used for storing serialised protobuf Kennels.
- Add the following code to
KennelAssetFactory.cpp:
UObject* UKennelAssetFactory::FactoryCreateBinary(UClass* InClass, UObject* InParent, FName InName, EObjectFlags Flags, UObject* Context, const TCHAR* Type, const uint8*& Buffer, const uint8* BufferEnd, FFeedbackContext * Warn, bool & bOutOperationCanceled)
{
    UKennelAsset* asset = nullptr;

    asset = NewObject<UKennelAsset>(InParent, InClass, InName, Flags);
    bool success = asset->parse(Buffer, BufferEnd - Buffer);

    if (success == true)
    {
        bOutOperationCanceled = false;
    }
    else
    {
        asset = nullptr;
        bOutOperationCanceled = true;
    }

    return asset;
}
This is the real meat of the factory.
We create a new UKennelAsset and then call the parse method on it.
We pass into the parse the Buffer parameter from the method call.
Assuming it parses correctly we return the newly instantiated kennel.
With that done we're almost finished with our factory and asset, we just need to do some work to hook it up into our module and plugin.
- Inside the
Publicfolder of theExamplePluginEditorfolder create a new file namedExamplePluginEditor.h - Inside the
Privatefolder of theExamplePluginEditorfolder create a new file namedExamplePluginEditor.cpp
These are the module files for our ExamplePluginEditor module.
They'll be almost identical to the ones Unreal editor created for the ExamplePlugin module just with a different name.
- Add the following code to the
ExamplePluginEditor.hfile:
#pragma once

#include "CoreMinimal.h"
#include "Modules/ModuleManager.h"

class FExamplePluginEditorModule : public IModuleInterface
{
public:
    virtual void StartupModule() override;
    virtual void ShutdownModule() override;
};- Add the following code to the
ExamplePluginEditor.cppfile:
#include "ExamplePluginEditor.h"

#define LOCTEXT_NAMESPACE "FExamplePluginEditorModule"

void FExamplePluginEditorModule::StartupModule() {}

void FExamplePluginEditorModule::ShutdownModule() {}

#undef LOCTEXT_NAMESPACE

IMPLEMENT_MODULE(FExamplePluginEditorModule, ExamplePluginEditor)
With those created all we've left is to associate our new module with our plugin.
- Open the
ExamplePlugin.upluginfile
This will be located in the ProtobufTestProject\Plugins\ExamplePlugins folder and is the file that is responsible for controlling how the plugin works.
Despite it's file type it is just JSON and can be edited with any old text editor of your choice.
So far we've been fine to use the defaults that Unreal created way back when we first made the plugin, but now we need to modify it.
- Add the following object to the
"Modules"array:
{
    "Name": "ExamplePluginEditor",
    "Type": "Editor",
    "LoadingPhase": "Default"
}
This is telling Unreal that our plugin to use two modules, ExamplePlugin and ExamplePluginEditor, and that one of them is a runtime module and the other an editor module. Now we're ready to test out our code.
- Open the project in Unreal editor
It will have to rebuild the plugin but once that is done we can now drag in a .knl file into the content browser and just like that we've got working assets.
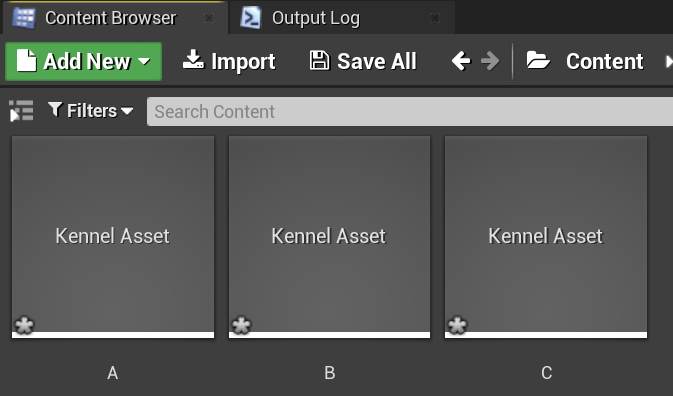
Now creating these files isn't too tricky because we've got the protobuf schema, but going through the steps to do that is a bit excessive in this already mammoth blog. This is left, as they say, as an exercise for the reader. Instead I've created a few already made a few you can download from the github repo.
Using our assets in Blueprints
The final step is to integrate our new protobuf asset into some blueprints. We are going to be doing this by creating a standalone blueprint library, because this is the easiest way to get it up and running.
- If not still open, open the project inside Unreal
- Inside Unreal editor create a new C++ class
- From the Add C++ Class wizard select Blueprint Function Library
- Click Next
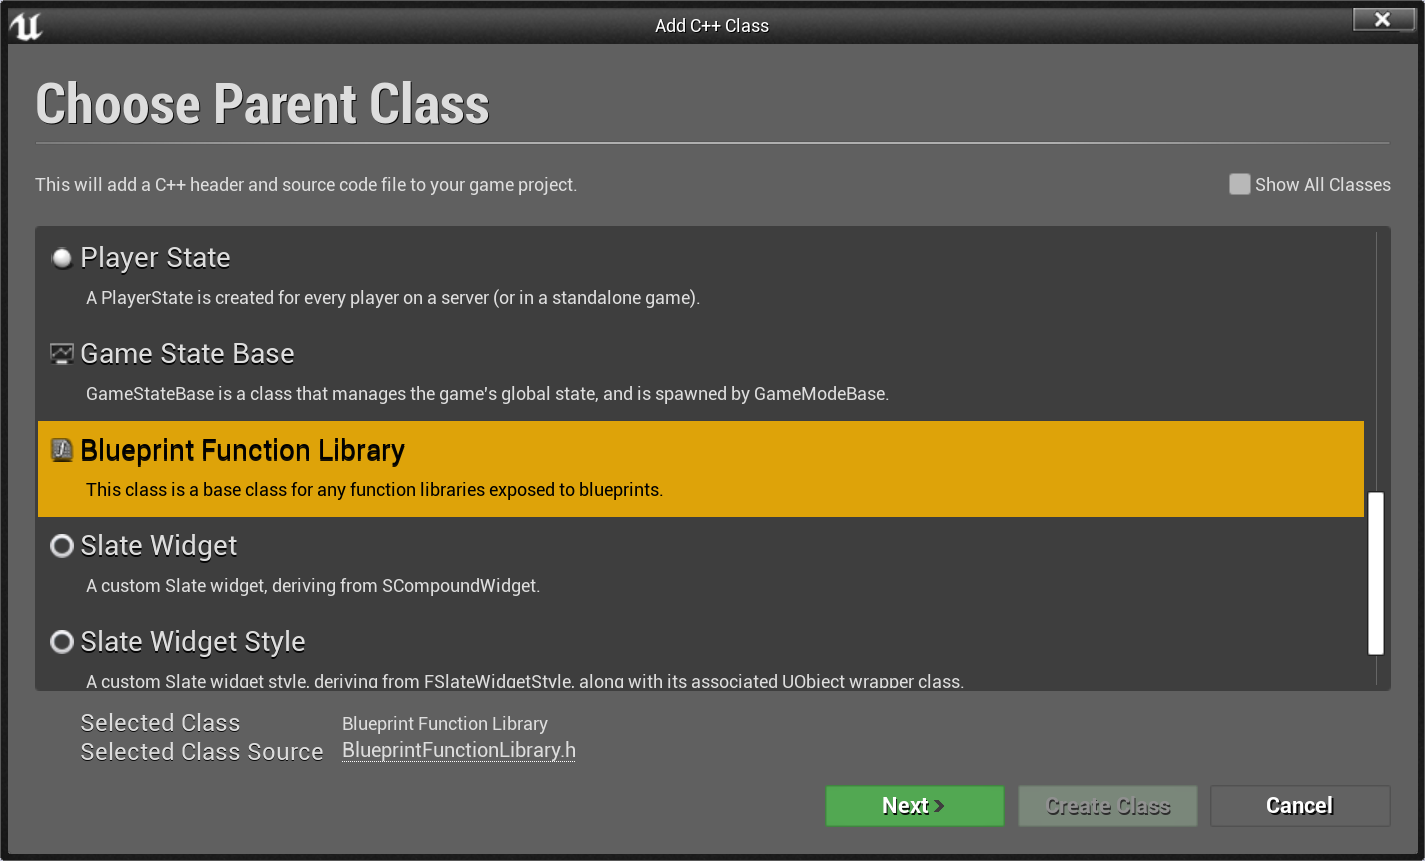
- Name the class KennelTestLibrary
- Select ExamplePlugin (Runtime) from the drop down
- Click Create Class
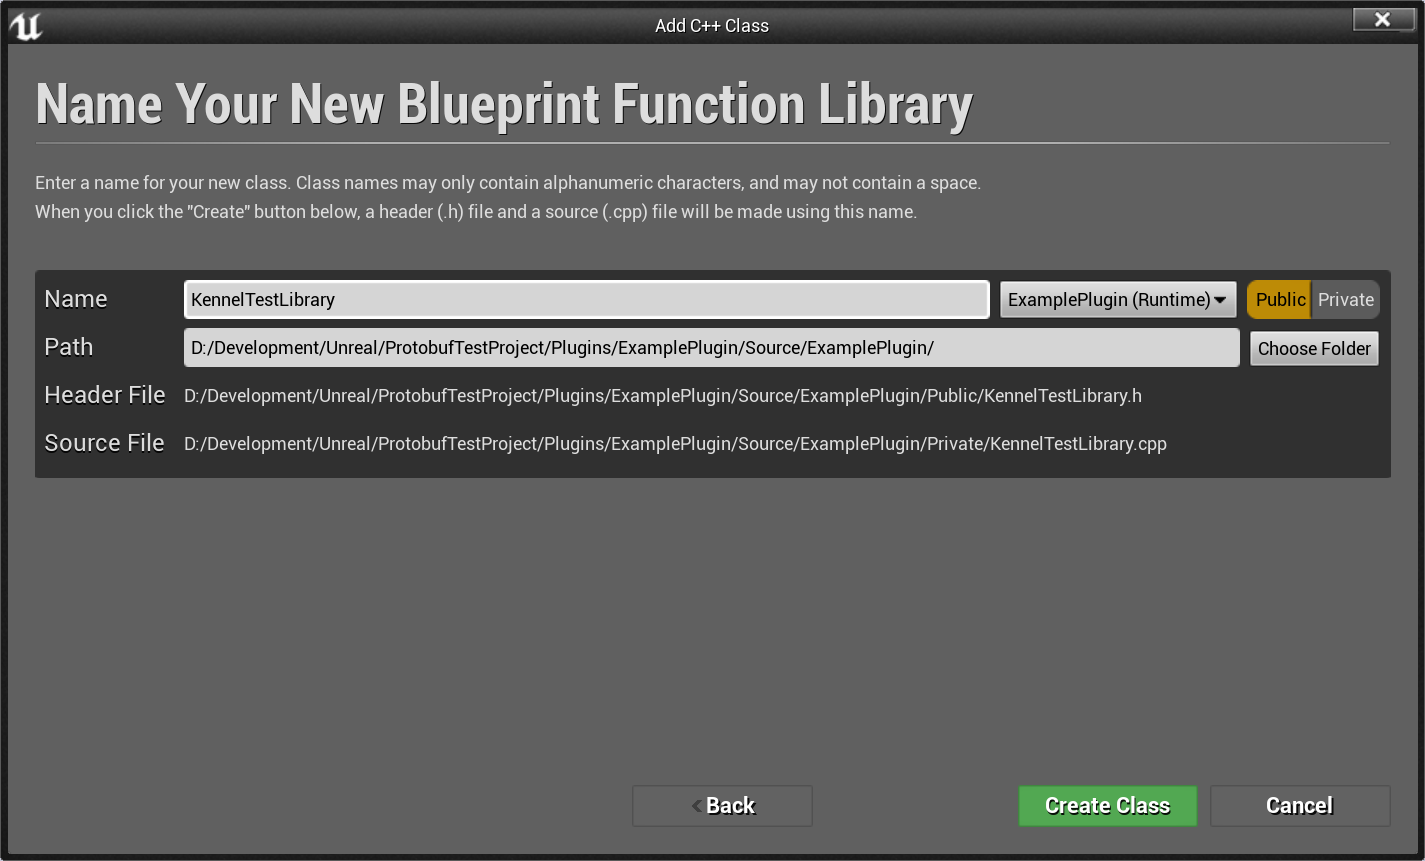
Once this has been created it will open up inside Visual Studio and we can create our blueprint.
- Open
KennelTestLibrary.h - Include the
KennelAsset.hheader:
#include "KennelAsset.h"As with our early includes this needs to go above the include of the generated header or else it won't work.
- Inside the class definition add the following code:
UFUNCTION(BlueprintCallable, meta = (DisplayName = "Lists the names of dogs inside a kennel", Keywords = "Kennel doggo list"), Category = "KennelTesting")
static TArray<FString> KennelDoggoList(UKennelAsset* kennel);
This is declaring a new function that will return an array of strings, each string will be the name of a Doggo inside of the Kennel.
The UFUNCTION macro with the BlueprintCallable flag set lets us declare that the function is to be presented as a Blueprint.
- Open
KennelTestLibrary.cpp - Add the following code:
TArray<FString> UKennelTestLibrary::KennelDoggoList(UKennelAsset * kennel)
{
    return kennel->goodBoys();
}
Here we are returning the array of names from inside the UKennelAsset, since we've already set everything up in the asset itself there is very little to do here.
Now we can start testing this out.
We will be making it so that an Actor will show on the screen the list of dog names inside of a kennel when the Enter key is pressed.
- Build the project in Visual Studio
- Go back into Unreal editor
- Create a new actor, I'll be using a cube for this but you can use anything you feel like.
- Add a new blueprint to the cube
- Name the blueprint KennelTestBlueprint
- Save it in the project
Contentfolder and not the plugin's
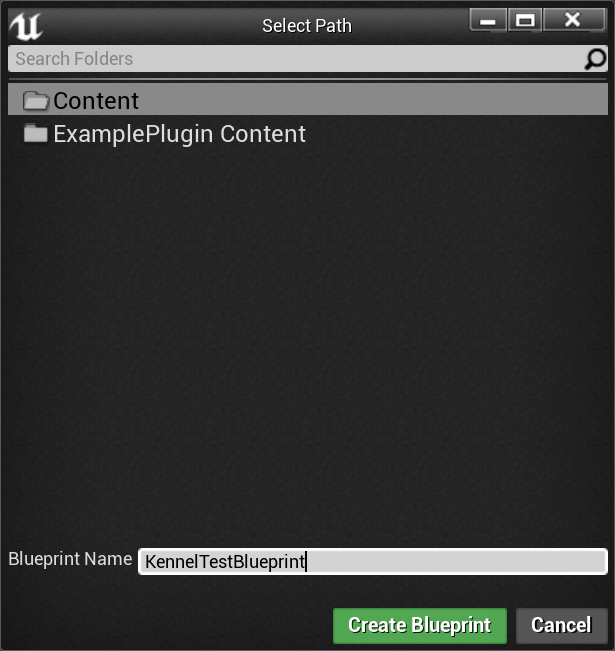
- Inside the Blueprint editor add a new variable
- Name the variable
Kennel - Set the variable to be Instance Editable
- Save this and open up the Event Graph
- From the Event BeginPlay node drag off and connect up the Enable Input node
- Add in a Get Player Controller node
- Set the Player Index to 0
- Connect the return value of the Get Player Contoller Node up to the Player Controller input of the Enable Input node
This will allow our cube to receive input events. We don't have to do it this way but this is probably the easiest way to get input working on non-player controllers. If you have a player controller that might be a better place. The blueprint should look like the following:

- Create an Enter event node
- Drag out from the Pressed Exec pin and connect up our Lists the names of dogs inside a kennel node
This is the blueprint function we created earlier. It won't necessarily be easy to find as the list of nodes gets pretty cluttered, the easiest way is to just search for the word kennel.
- Drag our
Kennelvariable into the graph - Choose the get option
- Connect the variable node up as in the input into our Lists the names of dogs inside a kennel node
- Drag off from the Lists the names of dogs inside a kennel node and connect a For Each Loop node
- Connect the Return Value of our Lists the names of dogs inside a kennel node as the Array input for the loop
- From the Loop Body exec pin drag off and connect a Print String node
- Connect the Array Element value up to the In String of the Print String node
This will loop through all the dogs inside our kennel and print their name onto the screen. The blueprint should look like the following:

- Save and compile the blueprint
- If you've not already done so drag a
.knlfile into the content browser - Select the cube and in the Details connect the kennel asset into the cube's Kennel variable slot.

- Play the project
- Press enter and enjoy the sight of dog names appearing on your screen
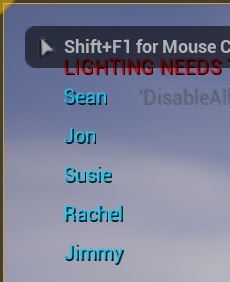
and just like that we're done!
The Future
So this seems to be working, or at least working well enough for me currently. The next step with this project is to try and do a build of Unreal out to a standalone game and see if it all still works. I wouldn't be surprised if it turns out there is some sort of magic in builds that means what I have done doesn't work correctly. Once builds are working the next trick will be to get it working for macOS.
Anyways, back to porting Yarn Spinner I guess.